 Ferrite
Getting started
This page takes you from download to a first agent task. It takes a few minutes. You bring the AI model. Ferrite brings the browser and the defense. Some words on this page are new, so there is a list of them on Words we use.
1. Install#
Get the build for your system from the download section. The builds are unsigned prototypes. Each system asks you once to confirm that you trust the app.
| Platform | File | First launch |
|---|---|---|
| macOS (Apple silicon) | ferrite-<commit>-macos-arm64.zip | Unzip it. Drag Ferrite.app to Applications. macOS blocks it the first time. See “Ferrite Not Opened” below. |
| Windows (x64) | ferrite-<commit>-windows-x64.zip | Unzip it. Run ferrite.exe. If SmartScreen (the Windows safety check) appears, choose Run anyway. |
| Linux (x64) | ferrite-<commit>-linux-x64.tar.gz | Extract it. Then run ./ferrite. Or run ./install.sh to add a launcher entry. You need a graphical session. |
Each system also has a media build, whose name ends in -media. It plays video and sound and makes calls. It carries everything it needs, so you install nothing else. Keep its files together: on Linux the lib folder must stay next to ferrite (./install.sh copies both), and on Windows the .dll files must stay next to ferrite.exe.
You can also build Ferrite yourself, or get the newest features. See Run it from source. The release page names the commit each build comes from. A build can be older than the source. The build published on 2026-10-02 (f4ed744) is older than these features. They are DevTools, page-control overlays, resizable panels, the crash banner and the WebGL setting.
2. Connect a model#
The agent needs a language model. A language model is the AI that reads pages and decides what to do. Until you connect one, the agent panel shows No AI model connected and an Open settings button. The browser still works as a normal browser.
- Open Settings. You have three ways. The toolbar menu (the three dots) has a Settings row. The keys Cmd/Ctrl+, open it. The agent panel's Open settings button opens it too.
- Under AI model, choose a provider. The choices are Ollama Cloud, Ollama (this computer), Google Gemini, Anthropic Claude and OpenAI or compatible.
- For a hosted provider, paste your API key. An API key is a secret code that lets the app use the provider's service. Get one at
ollama.com/settings/keys,aistudio.google.com/apikey,console.anthropic.comorplatform.openai.com/api-keys. Local Ollama needs no key, and neither does an OpenAI-compatible server on your own computer. For local Ollama, check the server address, and check that Ollama is running. - Press Load models. Ferrite asks the provider which models your key can use. This also shows that the key works. If it fails, the message says why. The reason can be a rejected key, a server that cannot be reached, or a timeout.
- Choose a Fast model. By default, the same model is also the Agent model. To pick a stronger model for driving the browser, untick Use the same model.
- Press Save and use. The status card changes to Connected. The next agent task uses the model. You do not need to restart.
What the two models do
The fast model runs once for each task. It predicts which capabilities the task might need. A capability is a kind of thing the agent may do, such as reading a page. The fast model adds to what a fixed set of rules already decided. The agent model reads pages and chooses each step. A small model is fine for the fast model. A stronger model helps for the agent model.
See Models and settings for more. It says where keys and settings are stored. It also says how environment variables change the settings.
3. Browse, and run a task#
Ferrite works as a normal browser first. Type an address, or any other text, in the address bar. Ferrite then does one of three things:
- An address with a scheme (such as
https://) is opened as you typed it. - A bare host such as
example.comgetshttps://added.localhostand IP addresses gethttp://. - Anything else is a Google search.
Using the browser lists the shortcuts, panels and page controls.
To give the agent a task:
- Open the Agent panel. Use the toolbar button, or press Cmd/Ctrl+Shift+A. Press Cmd/Ctrl+Shift+O to start a new chat.
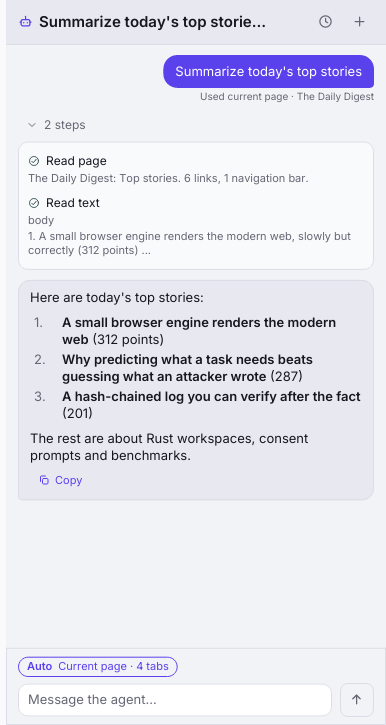
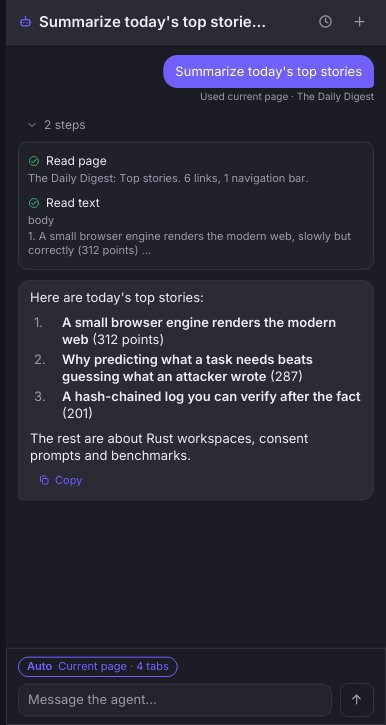
- Say what you want in plain words. For example: “Summarize the top stories on Hacker News”.
- Watch the activity feed. Each step shows what the agent did and what came back. The answer is shown as Markdown, which is simple formatted text.
Ferrite works out the task's expected fingerprint from your words only. The fingerprint is the list of tools and websites the task is expected to need. Earlier agent answers and page text never feed it. So a poisoned page cannot widen what the agent is allowed to do.
4. When a review or approval card appears#
Ferrite stops and asks you at two moments. The app draws both cards. A web page cannot write them. This question to you is called a consent gate.
Before the run: “Review before running”#
First, Ferrite does a dry run. A dry run is a practice run that does nothing real. If the dry run shows the agent trying something outside what your request implied, the panel lists each item in plain words. For example:
- Used tool: js.execute. The note says that arbitrary JavaScript is always reviewed. Nothing in your request could have allowed it.
- Contacted https://attacker.example. This origin is not authorized. An origin is a website address. Your request allowed the origin you were browsing. The card names it.
Each item has Reject and Approve buttons. A line down the left edge of the card shows the state. It is amber while you have not decided. It is green after you approve. It is red after you reject. The card itself stays neutral.
Proceed with approved stays disabled until you decide every item. Cancel (Esc) drops the whole task. A rejected item is blocked for the run. If you are not sure, reject. A rejected real action costs you a retry. An approved bad action can cost much more. Show dry-run evidence shows what the practice run recorded.
During the run: “The agent needs your approval”#
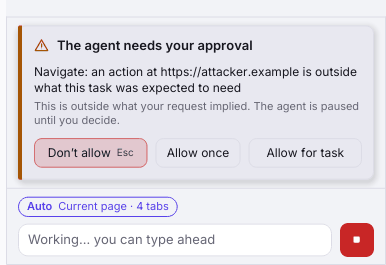
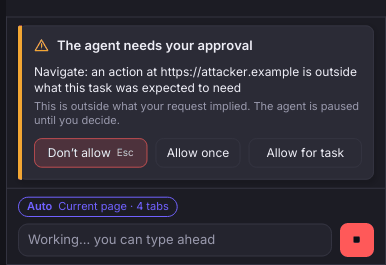
The dry run cannot see a page that only exists in the real run. So Ferrite checks every real action again. This check is called the runtime guard. An action outside the prediction pauses the agent. A card appears. The card names only the action and the site. It never shows text that the page wrote. The buttons are Don’t allow (Esc), Allow once and Allow for task.
The Audit panel shows the audit log and the model-activity trace. The audit log is a record where each entry is tied to the one before it. So a later change to an old entry can be found. Open the panel with the shield in the toolbar, or with F12. F12 opens this panel, not DevTools. DevTools is Cmd+Opt+I on macOS. Elsewhere it is Ctrl+Shift+I.
5. When the agent reaches a sign-in page#
Ferrite does not type passwords, one-time codes or card numbers. It also does not let the agent type them. Suppose a step lands on a page with a password field. A well-known sign-in page, such as Google's, counts too. Then the run pauses before any model call. The agent panel shows a card, for example Sign in to accounts.google.com.
- Sign in on the page yourself, with your own hands.
- Press I've done it — continue. The agent then carries on from the page as it is now. Or press Stop task.
Ferrite asks once for each site. A sign-in with many pages on the same host does not ask at every page. If you come back to the site later, it asks again. As a second line of defense, the page script also refuses to type into any password field or one-time-code field.
Where your data lives#
Everything is in one data directory. It is $FERRITE_HOME if you set it. Otherwise it is ~/.local/share/ferrite on every platform. (The just run-* helpers set FERRITE_HOME to a .ferrite folder inside the repository. Git ignores that folder.) The directory holds these things:
- the browser profile (cookies and storage stay after a restart)
- saved chats and bookmarks
settings.json- the sizes of your panels
- the model-activity trace
API keys are not there. They go to your operating system's credential store. The app's log file is in a separate folder. See Debugging and logs.
Troubleshooting#
- “This page stopped responding”
- The page's script thread died inside the engine. The page stays on screen, frozen, under a banner. Reload starts a fresh session for the same address. Details shows the reason and a backtrace that you can copy. A backtrace is a list of the code steps that led to the crash. The crash is also in the Engine tab of DevTools and in the log. See Debugging and logs.
- Pages never load
- You may be running a build without Servo. Servo is the web engine Ferrite uses to draw pages. In that case the terminal or the log says
Servo unavailable. The defaultcargo runopens the interface but cannot draw pages. Add--features ferrite-servo/servo, or use a downloaded build. See Run it from source. - A dropdown, dialog or file input does something unexpected
- Ferrite draws these itself. The file picker is a card where you type or paste a path. There is no native file dialog yet. See page controls.
- macOS: “Ferrite” Not Opened
- Apple has not yet notarized the builds. Notarizing is an Apple safety check. So Gatekeeper blocks the first launch. This does not mean the file is damaged. Click Done. Open System Settings → Privacy & Security. Scroll to Security. Click Open Anyway next to Ferrite. Then confirm with your password. You only do this once. The older right-click → Open trick no longer works on macOS 15 and later. In a terminal,
xattr -dr com.apple.quarantine /Applications/Ferrite.appdoes the same thing. - Google or GitHub says the browser “may not be secure”, or blocks sign-in
- These sites decide from the whole session. Ferrite is a young engine. Two things are in your hands. First, in Settings → Compatibility, keep Firefox-compatible selected. This is the default. It applies after a restart. Second, sign in yourself when the agent pauses. Neither one is a guarantee. Google in particular may still refuse an engine it does not know. See Limits.
- No AI model connected
- Open Settings. Finish steps 2 to 6 of the “Connect a model” list above. Without a model, the agent fails closed. That means it will not act at all.
- “The provider rejected this key”
- The key is wrong, was revoked, or is for another provider. Paste it again. Keys are shown masked.
- “Could not reach Ollama at …”
- Start Ollama on this computer. Then press Load models again. A local server must be
localhostor127.0.0.1. - The key vanished after a reboot (Linux)
- On Linux, the key is held in the kernel keyring. A restart clears it. For a permanent key, export
OLLAMA_API_KEY(orFERRITE_GEMINI_API_KEY) in your shell profile. - My saved choice is ignored
- An exported
FERRITE_MODEL_*variable overrides the file. Settings names the variables that are overriding it.